When Grey Marble Dreams Meet Real-World Stickiness
January 13, 2026
Explore Art3d’s peel-and-stick polished grey resin backsplash tiles—marble-like shine with DIY ease, but watch out for adhesion, cutting quirks, and pattern repeats.
When Grey Marble Dreams Meet Real-World Stickiness
Art3d’s peel-and-stick backsplash tiles offer a polished look—but don’t expect flawless adhesion or easy trimming.
Polished Grey That Actually Works (Mostly)
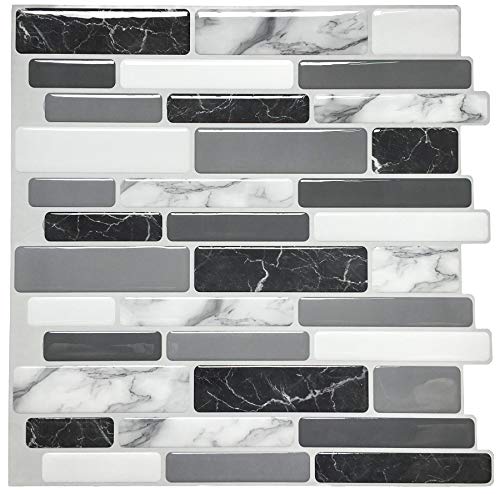
If you want to upgrade your kitchen backsplash without digging into grout and mortar, Art3d’s 12x12 inch peel-and-stick tiles in a polished grey resin finish make a decent choice. These tiles mimic marble pretty well, with enough shine to brighten a kitchen yet a muted grey that avoids feeling too cold or sterile.
Each tile covers a full square foot, about 40% more coverage than many 10x10 peel-and-stick competitors. A pack of ten will cover roughly ten square feet, enough for a moderate-sized backsplash or a laundry room wall. That means fewer packs, less fuss.
Pros:
- Realistic marble look without the mess or weight.
- Resin resists heat and some moisture.
- Smooth, polished finish hides minor wall imperfections.
Cons:
- Grey color can shift toward green in certain lighting.
- Pattern repeats identically—no natural marble variation here.
Simple Installation, But Not Foolproof
These tiles don’t require grout or glue—just peel off the backing, stick ’em on, and smooth out air bubbles. Most batches go up in about twenty minutes assuming a clean, flat surface and mild conditions. No fancy tools are mandatory, making this a feasible DIY weekend project.
Installation basics:
- Clean wall well with rubbing alcohol and let dry.
- Align tile, keeping the clear plastic on until final positioning feels right.
- Peel the plastic, then press firmly from the middle outward.
Installation headaches:
- Adhesive hates rough or textured paint and won’t stick to caulk lines.
- Cold rooms make the adhesive sluggish—aim for at least 60°F.
- Vertical seams might need some pressing again after a day or two.
Cutting Tips: Prepare for Some Fuss
Cutting these tiles neat is tougher than it sounds. The resin is thick and flexible, causing utility knives to leave jagged edges unless you’re careful. Guillotine paper cutters help but still require patience.
How to get better cuts:
- Score multiple times lightly instead of trying to slice through once.
- Use a sturdy metal ruler as a guide.
- Sand rough edges with fine sandpaper.
Heads up: uneven walls or rushed cuts will show obvious flaws right on the shiny surface.
Adhesion and Peeling: Your Wall’s Biggest Test
This product divides users into two camps: those who find the tiles stick firmly and last, and those watching corners curl or whole tiles peel off within days. It’s a gamble on the surface prep and wall finish.
Reasons for peeling:
- Drywall with only primer or satin paint may reject adhesion.
- Overlapping caulk creates tiny air pockets breaking the seal.
- Kitchens heavy with steam and grease weaken stickiness over time.
How to improve hold:
- Use a high-tack roller primer instead of brush-on primer on the wall.
- Press seams firmly every day for the first two days after installation.
- Keep double-sided tape handy for quick fixes on lifting corners.
Don’t count on permanent adhesion here—regular maintenance checks will be needed.
Cleaning and Maintenance
The resin surface handles light spills and splatters well. Wipe with a damp cloth to clean coffee or sauce. Use gentle soap and a soft sponge for oily spots. Stay far away from abrasive cleaners or steel wool which mar the polished finish.
Care tips:
- Clean spills promptly.
- Dry all seams well to avoid mildew.
- Press down any lifted edges before grime settles in.
Surfaces That Cooperate—and Those That Don’t
Best results come from smooth and flat surfaces like primed drywall, sealed plywood, or glossy laminates. Temperatures should be stable without extreme swings.
Surfaces to avoid:
- Fresh oil-based or shellac paints—they need weeks to fully cure.
- Textured walls or popcorn ceilings.
- Installing directly over caulking or grout lines.
- Areas subjected to direct heat or heavy grease, like behind a stove.
Verdict: Good for Low-Moisture, Low-Use Areas Only
Art3d’s peel-and-stick tiles manage to deliver a decent faux-marble upgrade without the usual mess or expense of traditional tile. They could be a fast fix for a laundry room wall or a spot away from direct heat and moisture. Yet the installation challenges—adhesion inconsistencies, tricky cutting, and the risk of peeling—mean they’re far from foolproof.
If color accuracy, perfect stick, and longevity under kitchen conditions matter to you, these tiles won’t be the one-stop solution. For quick, affordable sprucing in low-humidity zones, they’re worth a look. But for your main cooking backsplash, expect to put in extra effort—or look for something more heavy-duty.